


来源:http://lolis.info/2011-08/thread-1271-1-1.html
IPv4资源已经从好久前就已经枯竭,天朝电信等ISP丝毫没有加入IPv6支持的打算,怎样才能在IPv4环境下访问IPv6资源呢?本文将着重介绍。
说下配置环境:Centos+OVPN服务端,Win7作为客户端
其他要求:服务器要支持IPv6,要有大量的时间调试。
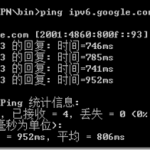
实现效果如下:

首先,先在VPS面板启用IPv6支持,记录下本机的IP

然后到HE创建一个tunnel,创建过程不表,界面留着别关。

上图为很重要的配置页面,切记留住
下面回到shell
vi /etc/sysconfig/network
加入以下内容:
NETWORKING_IPV6=yes
IPV6_DEFAULTDEV=sit1
保存,创建/etc/sysconfig/network-scripts/ifcfg-sit1
输入以下内容:
DEVICE=sit1
BOOTPROTO=none
ONBOOT=yes
IPV6INIT=yes
IPV6TUNNELIPV4=HESupplied-ServerIPv4address
IPV6ADDR=HESupplied-ClientIPv6address
第一段高亮是HE的服务器IPv4地址,第二段是客户端IPv6地址,分别填写,注意别把/64也写进去了
解释一下,上面是添加一个sit1的接口和HE的tunnel通信。
启用这个接口执行:
ifup sit1
无回显则正常。
重启网络服务:
/etc/init.d/network restart
要确保无错误才正常
然后启用IPv6转发支持:
在 /etc/sysconfig/network中,加入:
IPV6FORWARDING=yes
在/etc/sysconfig/network-scripts/ifcfg-eth0中,加入:
IPV6_ROUTER=yes
编辑转发选项(千万别和IPv4的转发混了,然后忘了添加):
vi /etc/sysctl.conf
加入以下内容:
net.ipv6.conf.all.forwarding = 1
net.ipv6.conf.default.forwarding=1
执行:
sysctl -p
/etc/init.d/network restart
当重启网络服务时,这时候不应该再看见有如下错误:
Bringing up interface eth0: Global IPv6 forwarding is disabled in configuration, but not currently disabled in kernel
Please restart network with ‘/sbin/service network restart’
然后构建OVPN,具体不在这篇文章讨论范围内。在服务器配置文件中,加入如下几行:
script-security 2
client-connect /etc/openvpn/client-connect.sh
client-disconnect /etc/openvpn/client-disconnect.sh
保存,编辑/etc/openvpn/client-connect.sh
输入:
#!/bin/bash
# This is a script that is run each time a remote client connects
# to this openvpn server.
# it will setup the ipv6 tunnel depending on the ip address that was
# given to the clientBASERANGE=”2001:470:baa2″ ##你的48位的ipv6地址块前缀,见图
# v6net is the last section of the ipv4 address that openvpn allocated
V6NET=$(echo $ifconfig_pool_remote_ip | awk -F. ‘print $NF’)SITID=”sit$V6NET”
# setup the sit between the local and remote openvpn addresses
/sbin/ip tunnel add $SITID mode sit ttl 64 remote $ifconfig_pool_remote_ip local $ifconfig_local
/sbin/ip link set dev $SITID up# config routing for the new network
/sbin/ip -6 addr add $BASERANGE:$V6NET::1/64 dev $SITID
/sbin/ip -6 route add $BASERANGE:$V6NET::/64 via $BASERANGE:$V6NET::2 dev $SITID metric 1# log to syslog
echo “$script_type client_ip:$trusted_ip common_name:$common_name local_ip:$ifconfig_local
remote_ip:$ifconfig_pool_remote_ip sit:$SITID ipv6net:$V6NET” | /usr/bin/logger -t ovpn
切记修改。
编辑/etc/openvpn/client-disconnect.sh
输入:
#!/bin/bash
# This is a script that is run each time a remote client disconnects
# to this openvpn server.BASERANGE=”2001:470:baa2″
# v6net is the last section of the ipv4 address that openvpn allocated
V6NET=$(echo $ifconfig_pool_remote_ip | awk -F. ‘print $NF’)SITID=”sit$V6NET”
/sbin/ip -6 addr del $BASERANGE:$V6NET::1/64 dev $SITID
# remove the sit between the local and:q
#remote openvpn addresses
/sbin/ip link set dev $SITID down
/sbin/ip tunnel del $SITID mode sit ttl 64 remote $ifconfig_pool_remote_ip local $ifconfig_local# log to syslog
echo “$script_type client_ip:$trusted_ip common_name:$common_name local_ip:$ifconfig_local
remote_ip:$ifconfig_pool_remote_ip sit:$SITID ipv6net:$V6NET duration:$time_duration
received:$bytes_received sent:$bytes_sent” | /usr/bin/logger -t ovpn
黄字部分切记修改,见HE配置修改。
然后配置权限:
cd /etc/openvpn/
chmod 777 ./*
用killall openvpn杀死OVPN进程后,重载配置文件,连接一遍VPN,看是否连得上。
连上OVPN后,在shell执行ifconfig -a 应该能看见除了sit1外的sit接口,例如sit6等等。
回到客户机,打开cmd,逐条输入以下指令:
netsh interface ipv6 add v6v4tunnel interface=IP6Tunnel 10.168.1.6 10.168.1.1
netsh interface ipv6 add address IP6Tunnel 2001:470:baa2:6::2/64
netsh interface ipv6 add route ::/0 IP6Tunnel 2001:470:baa2:6::1
黄字部分是需要修改的,网段是OVPN分配的网段,2001:470:baa2:6::1是由ifconfig -a命令查得sit接口的IPv6地址得到的,两个地址保持前缀一致,后面的::2和::1不需要一致。
连上OVPN,正常来说,ping一下ipv6.google.com 就会通了,如果不通,但是能解析出IPv6的IP,则说明是上述CMD命令有问题,应该删除后重新建立,否则会因为不会到达下一跳,出现ping不通,可 以解析的问题。但是同时要区别于IPv6 forward配置有误,IPv6 forward配置错误但是本地客户端无误,则应该出现可以ping通服务器本机的IPv6地址,ping不通其他地址的问题。
配置过程中还出现过“OpenVPN: script failed: could not execute external program”之类的问题,均是由于教程不全面导致的奇奇怪怪的问题,均已经在本文修正,如果在配置过程中发现有其他问题,应该理清思路,逐点排查,将 错误定位在最小的范围内,才有希望能解决。


![]()
本文由自动聚合程序取自网络,内容和观点不代表数字时代立场

.png)